This blog article targets current IAM consultants or implementors trying to get a grasp of the Omada Identity Suite (OIS) by describing how to get an initial set of Identities into OIS straight from an on-premise Active Directory system.
Recently we installed OIS 14.0.4.24 on three separate Azure Virtual Machines (VMs) to build a sandbox for experiments and acquisition of knowledge. After a bumpy but ultimately successful ride, we found ourselves having a working Omada installation.
In order to progress further, identities are needed to try out system import, as well as potential provisioning. We decided that having a couple of real identities gathered from our company-internal Active Directory system was the perfect way to overcome this hurdle. For this scenario, Omada offers several ways of importing identities: the one we opted for was the “Data Exchange” feature, which allows for an easy to use / straightforward first import scenario.
Current Setup
Our Omada installation is based on three virtual machines hosted on Azure, as well as a fourth that has solely the role of a Domain Controller. The three VMs were split up into the different distinct components of OIS:
Azure machines
The Enterprise Server
This is the heart of OIS. It does not only provide a fancy web interface that allows auditors, users and admins to take care of all their IAM-related tasks, but also manages launching any time-relevant event and executes the provisioning by covering the Omada Provisioning Service.
The SSIS Server
As the name already states this host only covers the SQL Server Integration Services. It connects to the systems, gathering the necessary information and running the corresponding SSIS-packages for data-transformation.
The MSSQL Server
This host’s only task is to expose an MSSQL instance to the other two hosts. It has slightly more disk capacity as every database needed in our scenarios will be created here.
Domain Controller
The Domain Controller is the silent master of the cluster. It controls hostnames as well as their DNS configuration. Also it is used to centrally manage system users for the other hosts, as they all are part of the Domain exposed by this Controller. It is a comparably small node, as there will be barely any hard work to do over here.
External nodes / On-premise Systems
The internal company Active Directory
This Active Directory keeps track of every single employee in our company. While it does not have a lot of information per user, it should be sufficient to grab the existing information and turn it into several identities in the OIS. This host, however, sits in a private network for security reasons. To establish a connection, a VPN tunnel is needed.
Prepare the Omada Landscape
Install VPN Client on Enterprise Server
To connect to the Active Directory, a VPN Client matching the VPN-server is needed. For running a Data Exchange, it is sufficient to install this Client on the Enterprise Server. However, installation on all nodes doesn’t hurt either, as long as the client is configured properly.
Install a LDAP/AD browser to find the correct BaseDN
As with any LDAP-explorer, we need to locate the correct place of where to find the employee entries in the hierarchy. With “JXplorer” and a few minutes of search, the correct path is found and saved for later use.
Setting up DNS Entry in Domain Controller (prevent IP-address usage)
To prevent the usage of IP-addresses, and to not pollute the Azure VMs DNS entries, we decided to exclude the DNS to be shared from the VPN-server.
Instead, we connect to our Domain Controller that also is hosting the local DNS server for the three other hosts and create an appropriate DNS-entry there.
Creating a Data Exchange
Login as Administrative OIS User, then go to
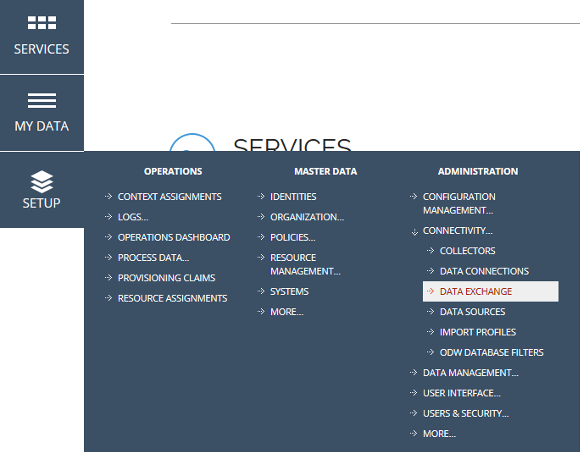
SETUP -> Administration -> Connectivity -> Data Exchange, click New
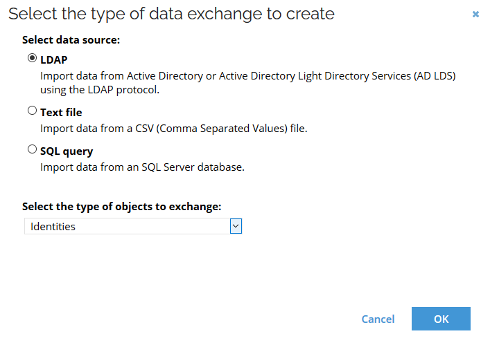
In the following popup choose LDAP and identities in the type of objects to exchange dropdown, then press OK.
Give this data exchange a meaningful name, e.g. AD Identity Creation.
As key field, choose Identity ID. It defines they unique key, specifying the attribute (more below) used determining unique entries.
If you want to be able to run this exchange multiple times (maybe to catch-up with “new hires”), set the Import will … dropdown to Create and update data objects.
This is beneficial to test the import multiple times in the future after its first execution, without running into trouble with duplications by created identities from previous runs.
If you want to get rid of phased-out identities (e.g. when employees have left the company), select Delete for Action on missing objects.
If you want to be really sure not to accidentally delete identities that were not imported by this data exchange in the first place, remove the tick for Perform the action on all missing objects.
This way, only those identities that were created by the Data exchange before will get removed.
For the Server Name, type in the hostname without protocol, port or any other path.
For us, it is: ad.office.acmecompany
Proceed with Server Port, Username and Password.
As port, we will use 389, which is the standard non-encrypted LDAP port.
For the username, the specific service user should be entered. As we are testing the capabilities, we are simply using our actual Windows user account.
The field Parent Node Naming Context expects you to enter the Base Distinguished Name under which the corresponding AD-User entries can be found.
In our case, the Windows users of our company are placed in:
OU=acmecompany,OU=Users,OU=OfficeTeam,DC=office,DC=acmecompany
The filter makes sure that you do not accidentally read roles or computers which might exist in the very same directory that you also have your users placed in.
Continue to Mapped fields, here you will specify the mapping between AD-entry and OIS-identity. To only read Users from AD, we specified (objectClass=user)
Setting up attributes / Mapped Fields
Now, we have to specify the mapping between Omada’s Identity Attributes and AD’s Attributes. The following are the bare minimum we found to be both useful and mandatory.
| OIS System Attribute | ADs Attribute Name |
| First name | givenname |
| Last name | sn |
| Identity ID | samaccountname |
| Valid from | whencreated |
| Valid to | whenchanged* |
Omada requires identities to have a Valid To date that is greater than the same identity’s Valid From date. However, as we do not maintain an expiration date in our Active Directory, we simply fill this attribute with the whenChanged AD attribute.
In most cases, its value will be greater than the one of the whenCreated attribute and thus is – in most circumstances – sufficient.
Now, hit Apply, then OK to return to the previous Data Exchange overview page. Here, you should now find the created entry.
Testing and execution
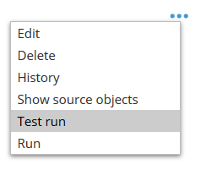
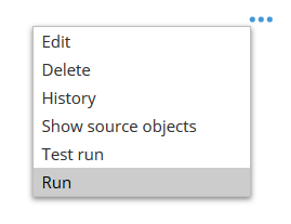
In order to test the settings, you have to click on the three small blue dots to the right at the end of the line for the just-created data exchange.
Here, you can choose the option Test Run. Confirm the following pop-up by pressing OK.
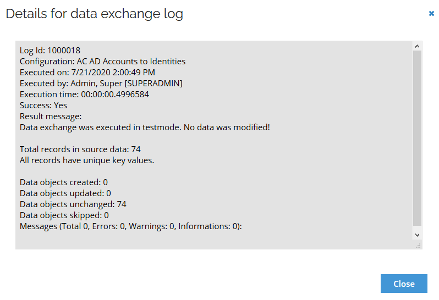
When the connection settings BaseDN and mapping are fine, you will get another small dialogue called Details for data exchange log.
Here, you can find crucial information about what is going to happen to OIS, once the import runs in “normal” mode. You can see how many accounts are to be created, updated, unchanged and potentially even deleted. If there are problems with accounts (e.g. missing attributes) you will get informed as well.
Once you confirm that everything is in order, you can close the pop-up by pressing Close and start the actual import by clicking the three dots […] and clicking Run.
After confirming the dialogue by pressing OK, the identities are about to get created in OIS. Once again, you will receive information about the identities changed in the data exchange log.

Outlook and Conclusion
Now, accounts can be imported from connected systems assuming that account joining rules are setup correctly. As employees come and go, this is of course not a sustainable solution for long-term identity management. The data-exchange can be scheduled in order to run, e.g. on a daily basis. That way, identities will be reread any given time creating, deleting and updating relevant entries.
For a smoother and better-integrated identity management, we advise to implement an authoritative source of identities instead. For this, almost any HR master data system can be used, like Employee Central or such. This has the advantage that more information on identity-level can be retrieved, resulting in cleaner and yet more sophisticated identities in your system from the get-go.
When you – or your company – are in desperate need of help with the integration of Master Data Systems, don’t hesitate to contact us!
Bereit für Dein neues IAM System?
Du hast Fragen rund um Identity und Access Management oder möchtest ein neues IAM System implementieren? Schreib uns einfach ganz unverbindlich eine Nachricht und lass Dich beraten!